Business Financial Template Excel File
How to create and upload your own custom Business Financial Template
Our portal offers a Common Data Model that we use for all new customers - but we know that there is no one-size-fits-all solution for Business Financial Template for all organizations. In this walkthrough, we’ll show you how to create and customize your own Business Financial Template so you can understand your client data in a uniform way and upload them to your portal server using WebDAV.
This walkthrough is made for portal administrators only.
You will need to be connected to your portal server via WebDAV using a tool like Cyberduck to follow the instructions below. If you haven’t, go to Uploading Files via WebDAV.
Download our Excel template
You will need Microsoft Excel on your desktop to follow the instructions below.
To reduce your work, we have created an Excel template that you can use to automatically map your CoA with our platform. To download it, you can access the file explorer through your Administration Portal.
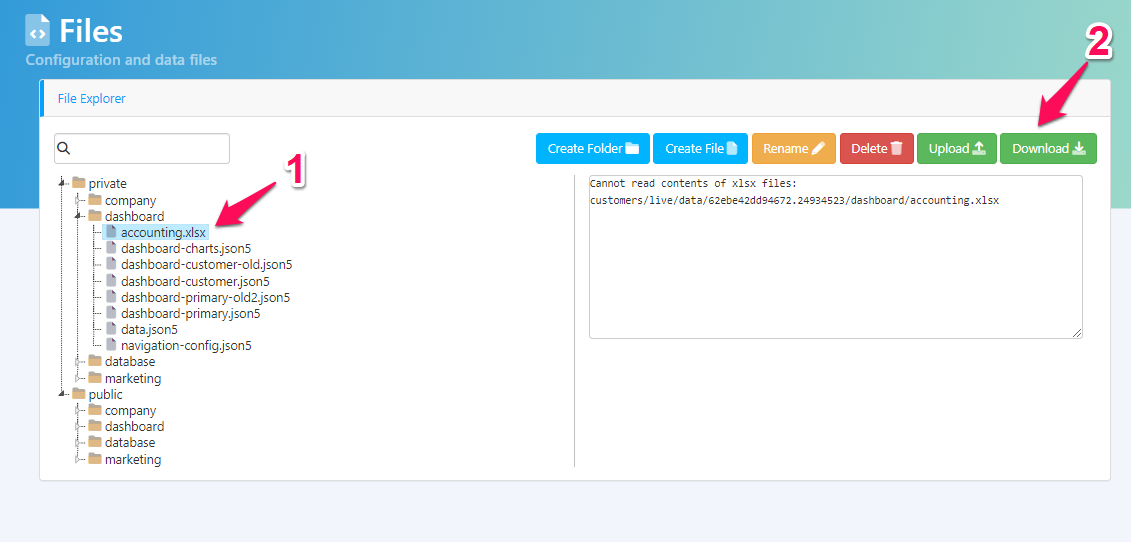
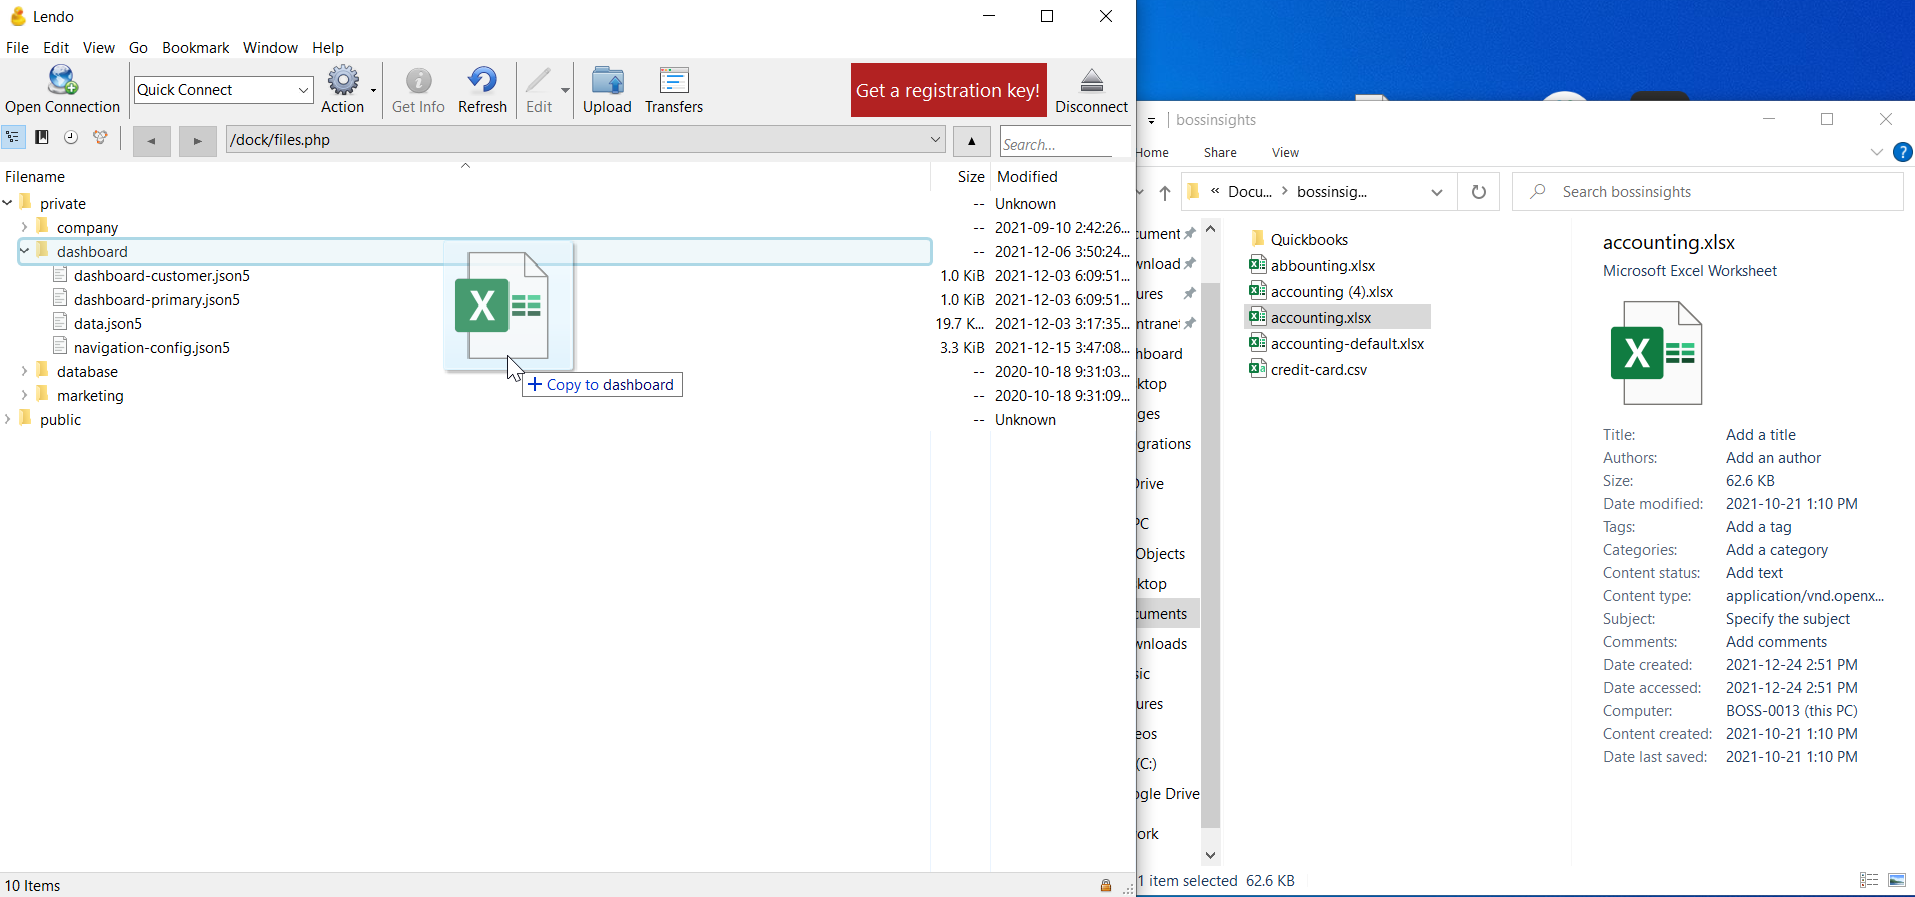
From the left navigation bar within your Administration Portal, you can click on “Developers” and then “Files” to enter the file explorer. From there, you want to click on the “Private” folder and then “Dashboard”. Next, click the accounting.xlsx file and click the green “Download” button. For detailed instructions please visit our File Explorer page.
Guidelines for customizing the Business Financial Template Excel file
On the Excel file, feel free to customize the Business Financial Template using the following guidelines:
Work only on the __MAPPING__ and __STANDARDIZATION__ spreadsheets. The “Standard Mapping” sheet is a reference for the standard Boss Insights accounts.
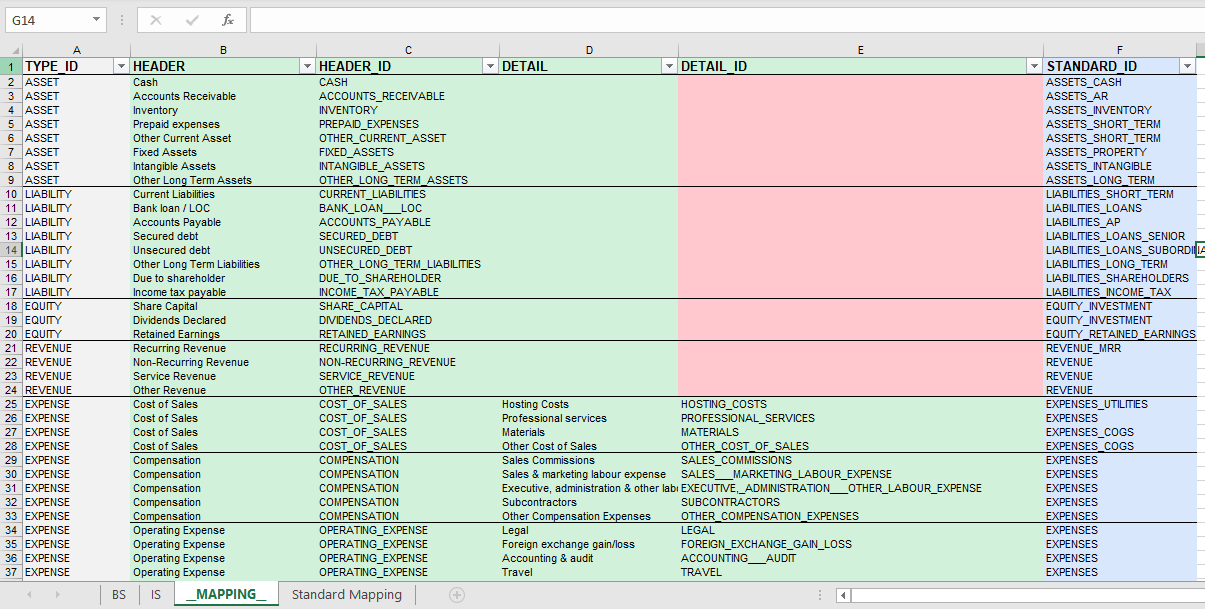
As you see below, there will be colored columns. Columns with a green highlight corresponds to columns that you may freely edit, while columns that are blue are columns that contain a dropdown box - you cannot customize the contents of the dropdown but you are required to choose one value per row for each category.
__MAPPING__ Spreadsheet
What are the columns for?
Below are the purposes of each column. Columns that have “Required” means that you need to fill them out or delete the row if you do not need that row. Columns that have “Optional” means that these columns are optional, and you may fill them out only if you want to or as required by your custom Business Financial Template framework.
Optional columns must be present in the file, but the values may be left blank
TYPE_ID (Required): This identifies what type of account each row is. ASSET, LIABILITY, EQUITY, REVENUE, or EXPENSE.
HEADER (Required): This is the name of the row and this is the text that will be shown for that account.
HEADER_ID (Required): This is the identifier of the HEADER. This should be generated using the excel formula in the cells of this column, to ensure the result is database-friendly. It should contain no spaces or special characters.
DETAIL (Optional): This is usually treated as a second category, or a drill down of the same row. For example, if you have several types of compensation, you will put COMPENSATION as the HEADER_ID and the several types of compensation such as Sales Commissions, Marketing Expenses, and Subcontractors three different rows of DETAIL, with each having the same HEADER_ID “COMPENSATION”. (see screenshot above)
DETAIL_ID (Optional): This is the identifier of the DETAIL. This should be generated using the excel formula in the cells of this column, to ensure the result is database-friendly. It should contain no spaces or special characters.
STANDARD_ID (Required): The standard ID is the Boss Insights identifier, all accounts should map to a Boss Insights standard account.
TAGS (Optional): An additional method of categorizing an account that can be used in custom formulas
CUSTOM_ID (Reserved): This should be generated using the excel formula in the cells of this column, to ensure the result is database-friendly. The CUSTOM_ID is referenced by the __STANDARDIZATION__ sheet.
DESCRIPTION (Optional): Additional description text that will be shown along side the given account to help your users understand the purpose for that account.

The description will appear below the account name
__STANDARDIZATION__ Spreadsheet
The objective of the __STANDARDIZATION__ spreadsheet is to normalize the accounts mapped from the accounting applications to those accounts in the __MAPPING__ spreadsheet and automatically map them in the Financial Mapping page.
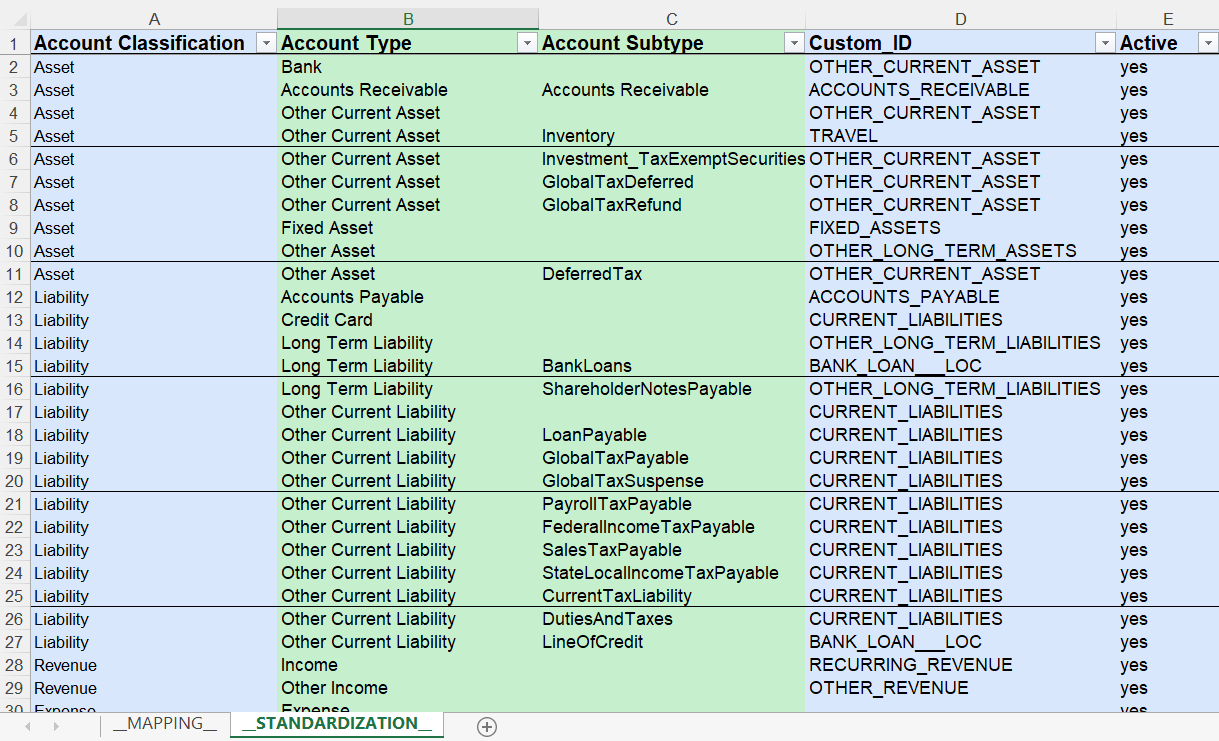
Account Classification (Required): Asset, Liability, Equity, Revenue or Expense.
Account Type (Required): First level of hierarchy of the accounts.
Account Subtype (Optional): Second level of hierarchy of the accounts. Not all accounts or apps will require it.
Custom_ID (Required): Contains a dropdown with all accounts listed in the __MAPPING__ spreadsheet.
Setting up the auto-mapping
Each supported app has its own way of categorizing the accounts. To ensure they will be mapped to the accounts present in the __MAPPING__ spreadsheet, each row of the column Custom_ID has a dropdown containing a list of CUSTOM_ID accounts from the __MAPPING__ spreadsheet. Just select the CUSTOM_ID you would like a specific account from an app to be mapped to. In the example below, four Asset accounts from QuickBooks have been mapped to the normalized accounts listed on __MAPPING__.
To configure it on the __STANDARDIZATION__ worksheet, the values on the Account Classification, Account Type, and Account Subtype columns must match the connected app’s classification pattern. This can be found in the Financial Mapping page by hovering the cursor over the account’s name like in the GIF below:

In this example, Revenue is the Account Classification, Income the Account Type and SalesOfProductIncome the Account Subtype. When filling out the accounting.xslx spreadsheet with those values, this is the correspondence that should be made for the accounts to be mapped to the desired custom account (Custom_ID).

Every row of the Custom_ID column has a dropdown containing all accounts listed in the HEADER_ID column of __MAPPING__ worksheet. To map them to one of your custom accounts, just select the value in the dropdown. In the example below, the “Bank” and “Accounts Receivable” accounts from QuickBooks are being mapped to “CASH” and “AR”, respectively.

How to upload custom Business Financial Template to your Boss Insights portal server
Once you’re done customizing your Business Financial Template, here are instructions on how to upload:
Step 1: Ensure that you’re connected to your portal server using WebDAV. If you have not connected to WebDAV yet, please follow the instructions here: Uploading Files via WebDAV
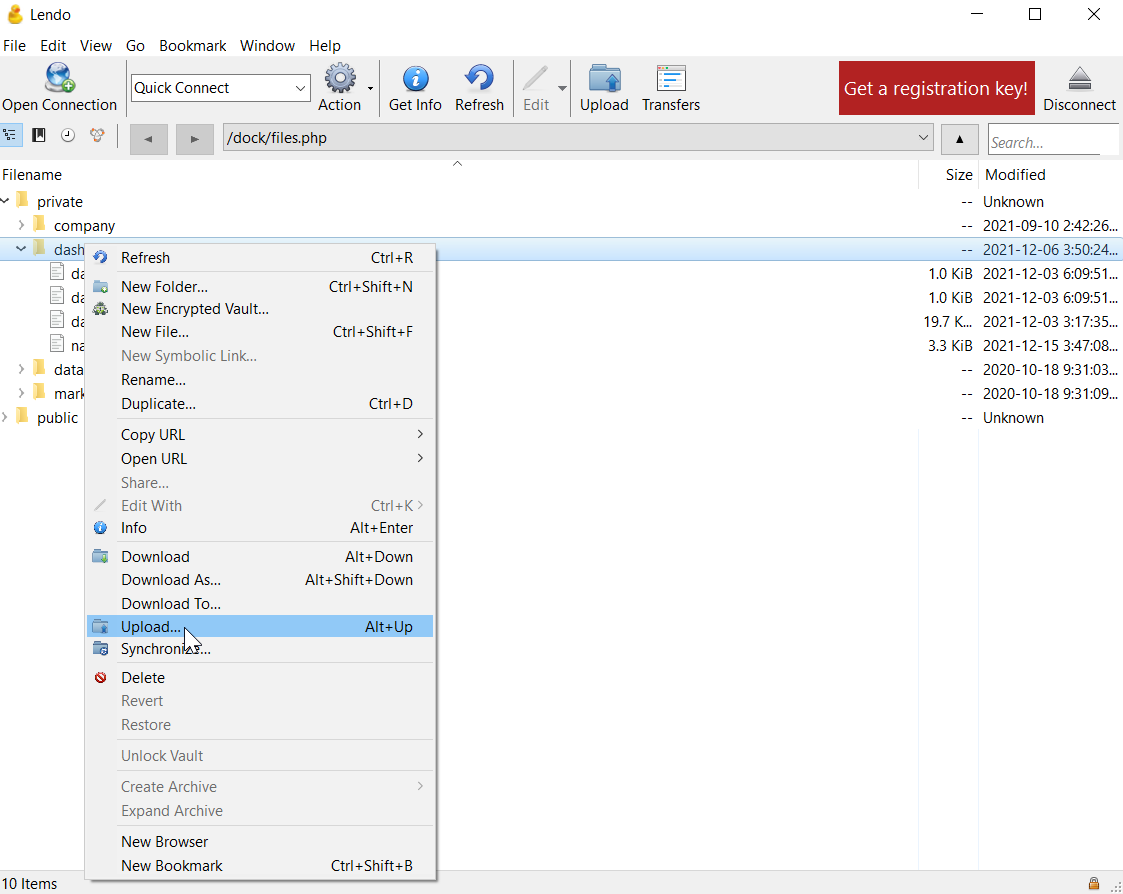
Step 2: Double-click the “private” folder, then double-click the “dashboard” folder.
You may or may not see a file with the name “accounting.xlsx”. If you don’t see that file, that means that you do not have a custom Business Financial Template yet - please proceed to Step 3. If you see that file, please follow Step 2a.
Step 2a: If you see a file called “accounting.xlsx”, please rename it by right clicking on the file, and selecting “Rename”. After the “accounting”, please add “backup” and the current date on the filename. This will make sure that you have a backup of your file in case you have any errors with your new file.
Step 3: Right click on any file inside the “dashboard” folder, then click upload. Select your new Business Financial Template Excel file from the screen prompt.
You may also open the location of your file in another window and drag-and-drop the file to inside your dashboard folder. It will look like this:
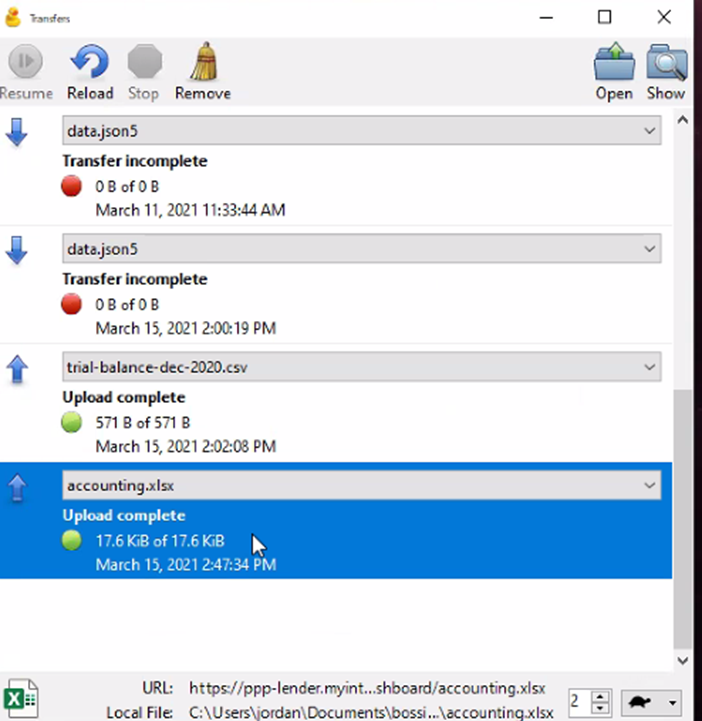
As soon as you upload, the file transfer manager will appear. Make sure to wait for the upload to complete before you proceed to Step 4. The file transfer manager, upon completion of the upload, should look like this:
Step 4: Ensure that the name of your Excel file is exactly “accounting.xlsx” (without quotes). If the filename is different, our portal will not recognize that it is your custom Business Financial Template.
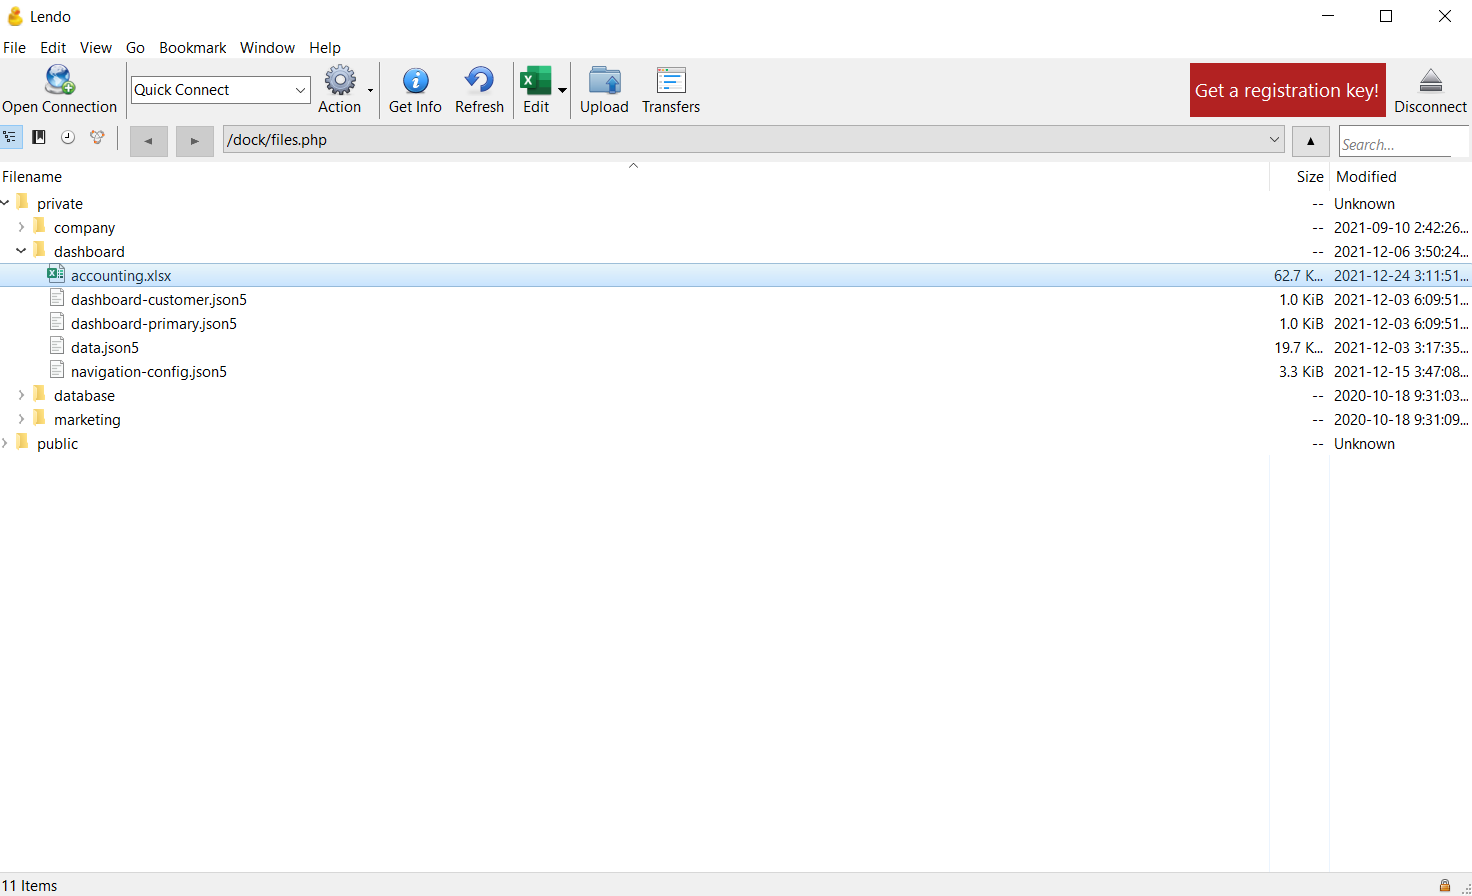
With the accounting.xlsx successfully uploaded, your portal server should look like the screenshot below. The key points to look at are:
The filename should be accounting.xlsx
The file accounting.xlsx should be inside the dashboard folder.
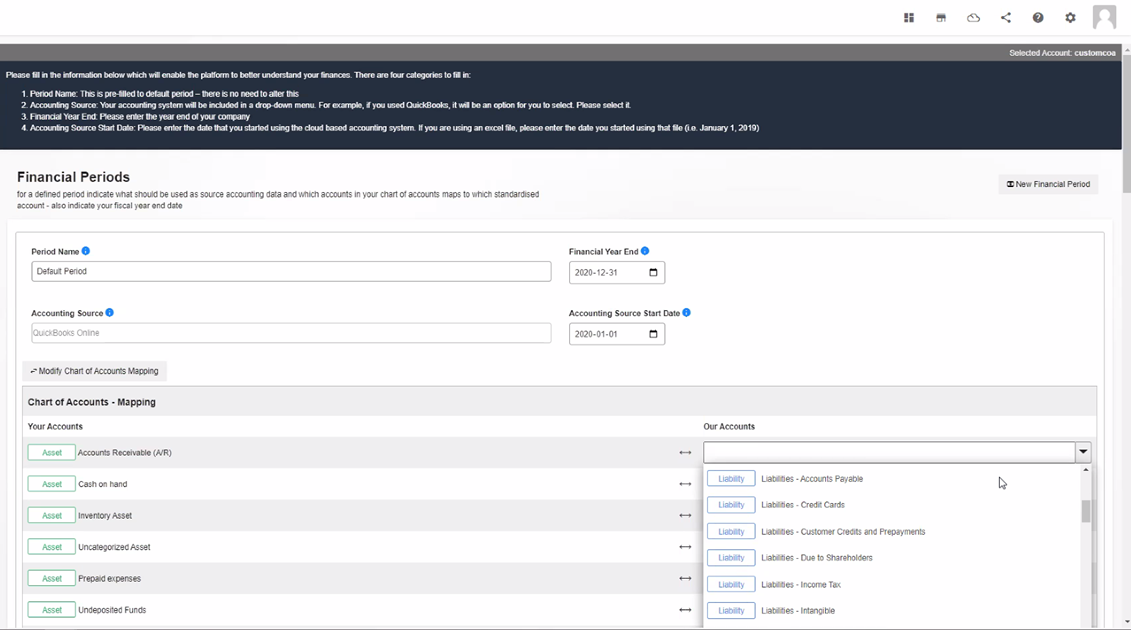
Step 5: Go to your portal. Select any customer from the dropdown list and select Financial Mapping” on the left navigation bar. You should see that the values you set in your custom Business Financial Template are selectable on the dropdown. It should look like this:
You have now created and uploaded your own custom Business Financial Template.
Frequently Asked Questions (FAQs)
How do I add new rows in the Excel file?
You may add new rows by right clicking on any cell and selecting “Insert Row”, and then selecting “Entire row”. A new row will be inserted above the selected cell. Be sure to copy the existing formulas for the HEADER_ID, DETAIL_ID, and CUSTOM_ID columns into your new row.
How do I delete rows I do not need?
You may delete rows by right clicking on any cell of that specific row, selecting Delete Row, and selecting “Delete entire row” on the prompt.