API Postman Guide
Follow this guide to learn how to use Postman to make requests to the main Boss Insights API. You may visit https://api.bossinsights.com/ to view our API reference and available endpoints.
We have made a separate Postman guide and collection for the Administration API. Please visit our Admin API Postman Guide.
Prerequisites:
Postman. Please download Postman to continue, you may use the free version.
Postman Collection. We have provided a Postman collection to help you start developing with our API quickly.
Account Information. Please have your subdomain and domain ready as well as your username and password. Please see the Variables table for more information.
Variables
Variable | Value | Description |
|---|---|---|
|
domain = | Your subdomain with either For example, if your financial institution’s account subdomain is “example” and you are on the Canadian server, your baseUrl will look as follows:
|
| Your username | Your username |
| Your password | Your password |
Additional Parameters
Param | Value | Description |
|---|---|---|
X_ACCOUNT_KEY | String | Please enter the account key of the business client you are trying to retrieve data from. |
Obtaining Account Key
You can obtain the business client’s account key by visiting your admin portal and going to Management > Accounts from the left navigation menu. You will see a list of business accounts, under their names you will see the account keys. Please keep note of the account key of the business you are interested in.

How to Use Postman
Step 1: Import Collection
Please download the Boss Insights API collection from above and import it into Postman. You can do this by selecting the Menu icon (3 horizontal lines) from the top left navigation, File, and then Import.
Step 2: Set Variables
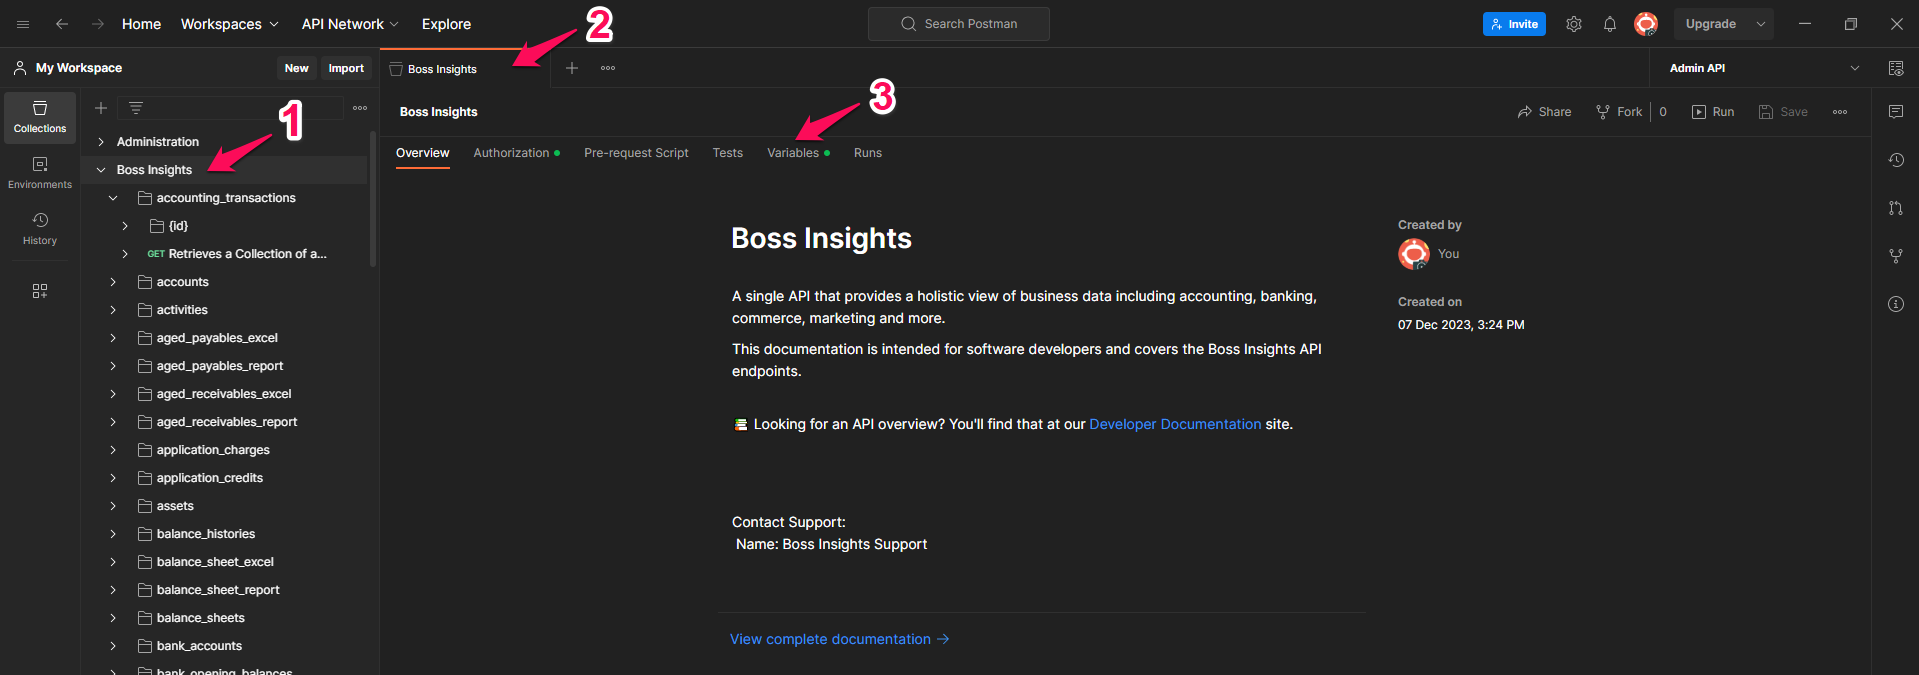
Once the collection has been imported, click on “Boss Insights” from the left navigation menu (1). This will open a tab called “Boss Insights” (2).
Within this tab, there will be a row of secondary tabs, please select “Variables”(3).

Once the “Variables” tab is open, please set the baseUrl. You can change the “Current Value” column. The baseUrl will follow the following format:
https://{subdomain}.{domain}/api

Please click save when you are done.

Step 3: Set Authorization
Next, you can select the secondary tab “Authorization”. This is where you will enter your username and password. You may optionally choose to save these as variables such as in Step 2 for added security.
Please click save when you are done.

Step 4: Select Endpoint
Now that the variables and authorization are set, you can select an endpoint. For this tutorial we will be using the Accounting Transactions (accounting_transactions) endpoint which performs a GET request, retrieving data. You will also find POST requests throughout this collection, which push or write data.
First, select the folder (1), then the endpoint (2), this will open a new tab (3).

Step 5: Set Parameters and Send
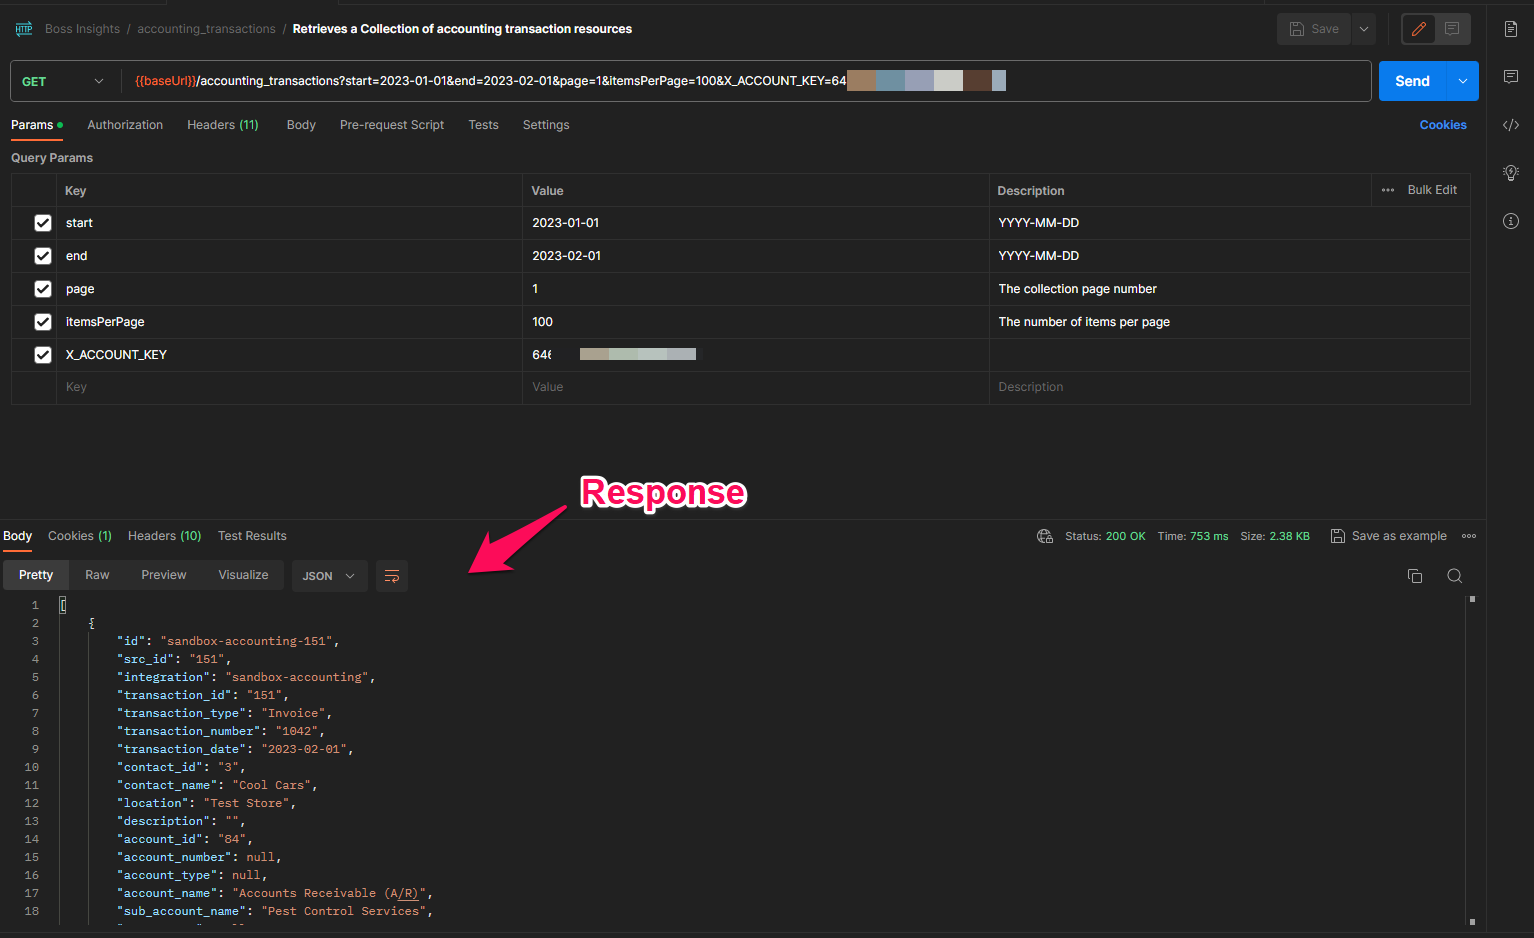
Ensure that the “Params” tab is selected (1). Here, you will see a table labelled “Query Params”. This table contains the necessary keys, their values, and descriptions. The only column we will change will be the “Value” column (2). The “Description” column (3) provides the formats that we will follow when we enter in the values. You might notice that the request has an orange {{baseUrl}} (4), this is the variable that we set in Step 2 and Postman will automatically use it.

Please fill in the values for the information you require. For example if you need accounting transactions from January 1, 2023 to February 1, 2023, your start value would be: 2023-01-01 and your end value will be 2023-02-01. The param page refers to the collection page number and itemsPerPage refers to the number of items that will appear on the page. Each endpoint will have its own set of query parameters that need to be filled out.

Please create a new param here called X_ACCOUNT_KEY and set the account key to be that of the business client you are trying to retrieve data from (1). Please view the Additional Parameters table above. Don’t forget to save when you are done (2).
Once the information is filled out, you can hit the blue “Send” button (3).

Step 6: Response
If you followed this tutorial, you will receive a response body on the same page. You can view it in different formats by selecting the configuration options such as “Raw”. You can also click the dropdown menu labelled “JSON” to change it to XML, HTML and more.

You successfully made a request and received a response from the Boss Insights API using Postman!
API Reference
For details on making other requests with different endpoint please visit api.bossinsights.com. This reference will contain information about query parameters and authorizations.