Workflow Editor
The workflow is what a business customer uses to navigate through the portal. You may visit the Workflow Customization page to learn more.
The Workflow Editor is a a simple drag-and-drop system to create a custom navigation for business customers to work through.
Advanced Validation
You can set up an advanced validation system with your workflow to provide visual feedback on the status and progress of workflow steps. To learn more about this please check out our Checkersdocumentation.
.png?inst-v=1180ed29-71ac-43a2-9383-c664da630155)
Figure 1. Image of advanced validation
Where is the Workflow Editor?
After logging in to the administration portal, please refer to the left navigation menu and select “Developers” and then “Workflow Editor” from the dropdown menu.
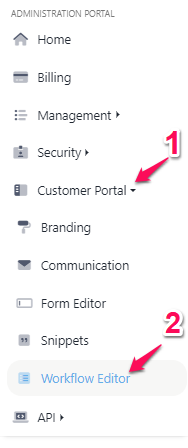
Figure 2. Where to find Workflow Editor
Edit the Workflow
In the right column (or top in mobile-view), you will see the catalog containing components that can be dragged and dropped into the workflow column on the left (or bottom in mobile-view). The workflow column is what will be displayed to your business customers.
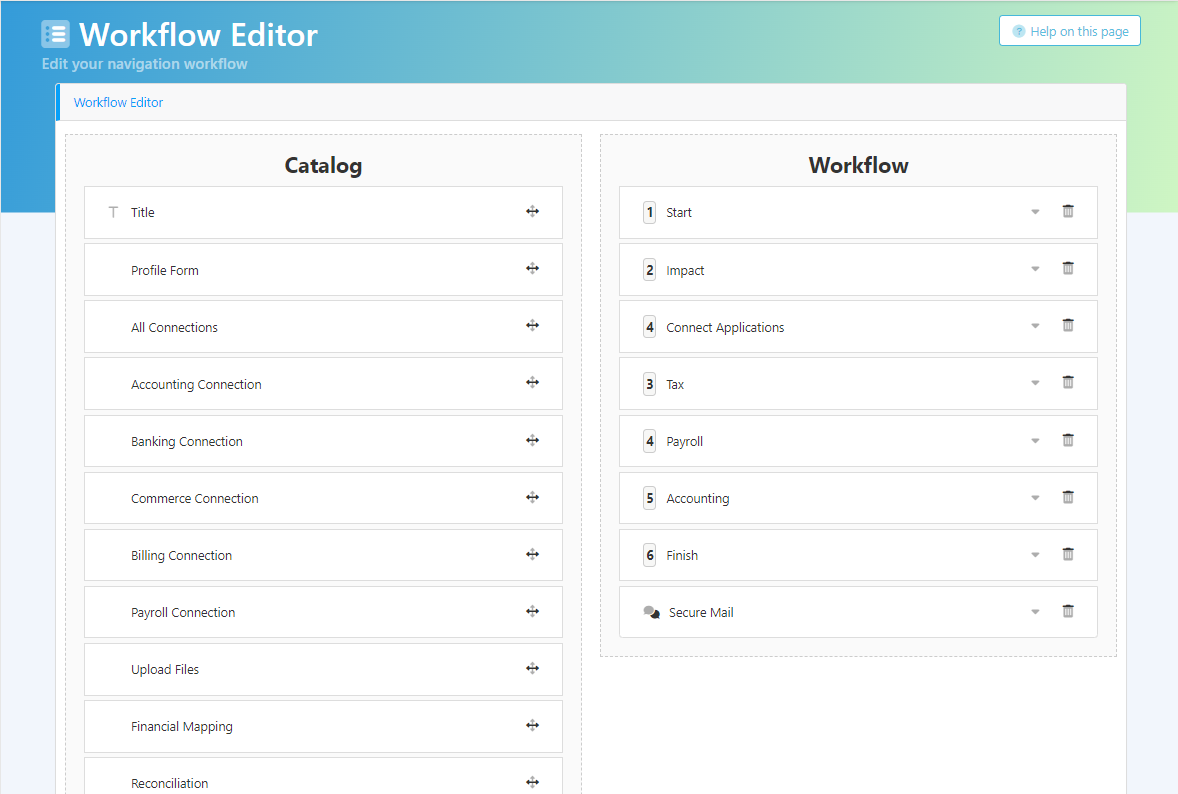
Figure 3.1. Catalog and workflow columns
Below is an example of a finished workflow that matched the configuration in the left workflow column above.
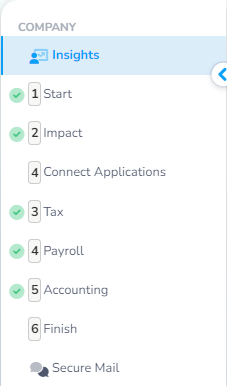
Figure 3.2. Example workflow reflecting workflow column shown in Figure 3.1.
Configuring Components
Once a component has been placed into the right workflow column, you can view the configuration options by clicking the down arrow towards the right of the component block.
Figure 4.1. Select the arrow to display configuration options
This will reveal a dropdown menu with configuration options, please refer to the table below to see what each option entails.
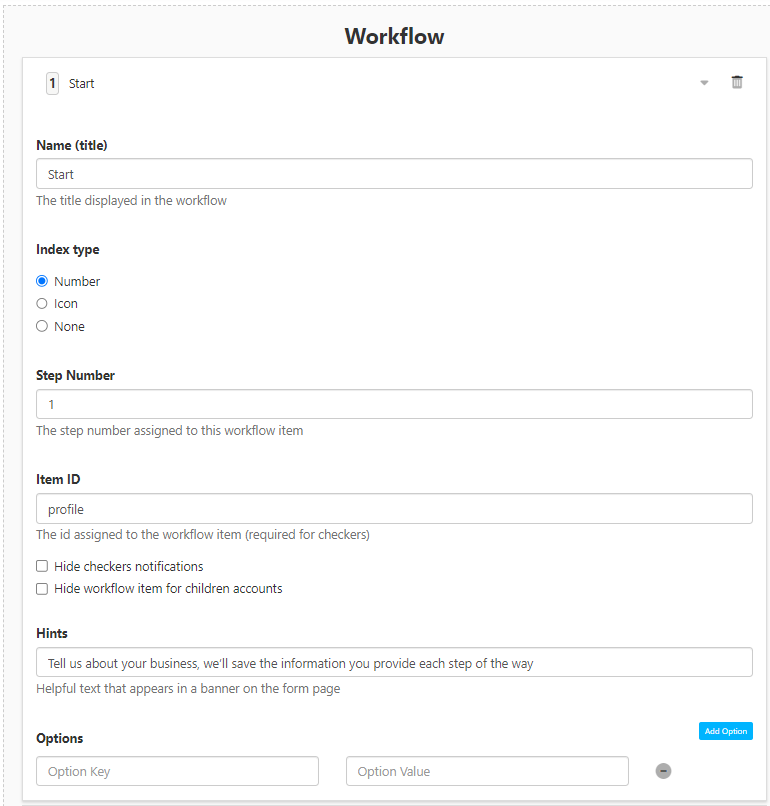
Figure 4.2. Example of configuration options
Table of Basic Configuration Options
Please check out the component catalog below for additional configuration options for components.
Configuration Option | Description |
|---|---|
Name (title) | This is the title text that will appear on the workflow |
Index Type | What appears next to the title of the workflow step. Possible values: Number , Icon, None |
Step Number OR Icon Name | Step Number: Only visible if you selected Number as Index Type. You can enter an integer value for which step number this particular step refers to. Icon Name: Only visible if you selected Icon as Index Type. You can select from a collection of duotone icons to use. You can find the names of possible icons as a .txt file on the interface. |
Item ID | For checkers configuration. Checkers rely on menu items have IDs to, in the data.json5 file this will be called menuId. Please refer to the checkers documentation for more details. |
Checkbox: Hide checkers notifications | If this is selected, the visual indicators called checkers will not be visible |
Checkbox: Hide workflow items for children accounts | If this is selected, business customers will not be able to see this workflow step. It will only be visible to the financial institution. |
Hints | Helpful text to include that will appear as a banner on the form page. |
Deleting Components
You may delete any component you do not want to keep by hovering over the component in the workflow column and clicking the trashcan icon on the right.
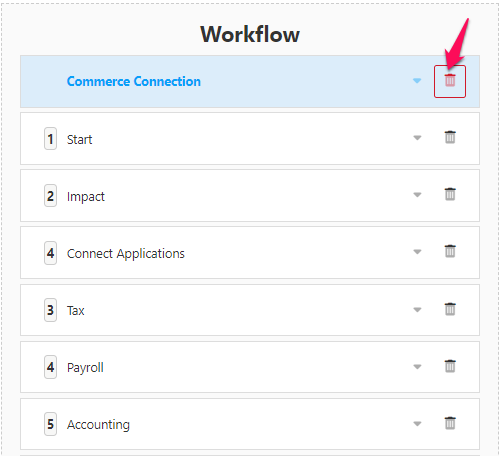
Figure 5. Delete a component
Saving Workflow
To save your work, please click the “Save Changes” button in the bottom right. Please note that your progress will not be saved unless you click the save button.
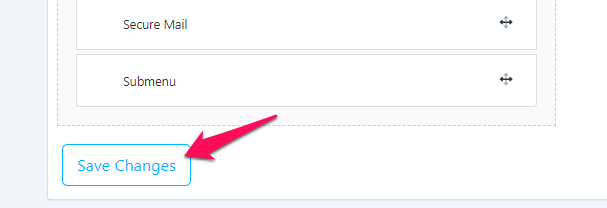
Figure 6. Save button
Component Catalog
Component | Description | Additional Configuration Options |
|---|---|---|
Title | Name of your workflow | |
Profile Form | Primary form, typically used for account information collection | |
All Connections | A single page where business customers can select multiple integration connections. | Available Integrations: Choose which integrations connection options you would like your business customer to choose from (Checkboxes: Accounting, Payroll, Commerce, Banking, Billing). |
Accounting Connection | Business customers can only select from accounting integrations to connect to. | |
Banking Connection | Business customers can only select from banking integrations to connect to. | |
Commerce Connection | Business customers can only select from commerce integrations to connect to. | |
Billing Connection | Business customers can only select from billing integrations to connect to. | |
Payroll Connection | Business customers can only select from Payroll integrations to connect to. | |
Upload Files | File vault where files can be uploaded. | |
Financial Mapping | Typically only shown to financial institution, here you decide where data from integration connections is mapped to. | |
Reconciliation | A page where the last reconciliation date for a data source can be set. | |
Forms | A page that displays a form. To learn more about creating custom forms, please visit the Form Editor documentation. | Available Forms: A drop down menu where you can select which form to display. Forms you have available can be viewed from Form Editor tab in left navigation menu in administration portal. |
Secure mail | Secure messaging system between business customer and financial institution. Email notifications are sent to according parties when a message is received. | |
Submenu | A submenu can be added within your workflow, it will act as a secondary menu. The same component items can be dragged and dropped under Menu Items. | Menu Items: Drag and drop components from the left catalog menu to display within the submenu. You cannot add a submenu to a submenu. |