Users & Groups

User Management
This article covers how to add and remove users from the platform. You may add or remove users from the parent account, which will be the account of your financial institution, or you can add or remove users from your business customer’s account. The latter is useful for adding a team member from the financial institution as a user to gain access to the business account.
Adding a User to Financial Institution
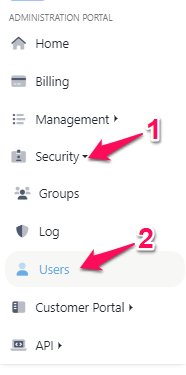
Step 1: Find users list
To add a new user sign in to the Portal Administration. From the left navigation bar, select Security > Users.
Step 2: Add a new user
Next, click the “Add User" button located towards the right of the page.

Step 3: Configure new user information
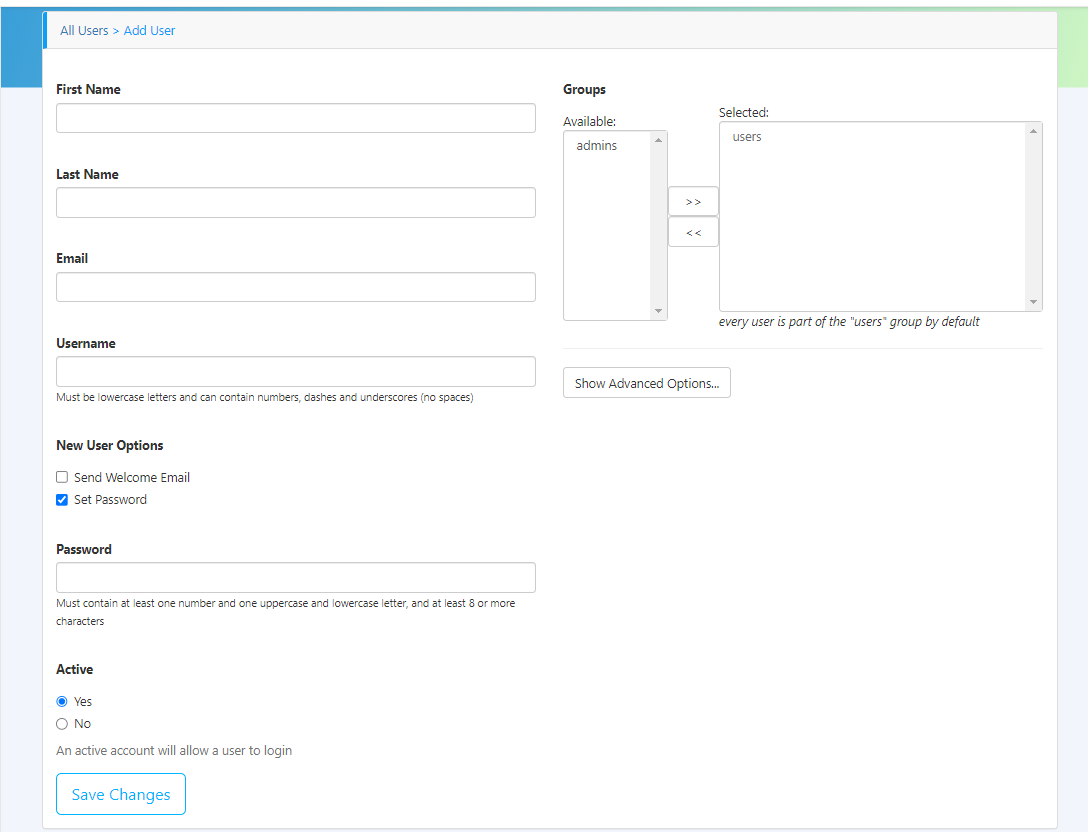
For the following steps, please reference the image below.
Field | Value | Additional Information |
|---|---|---|
First Name | First Name | |
Last Name | Last Name | |
Email address of new user | This email address can be used to log in once user is created | |
Username | Unique username | This username can be used to log in once user is created |
New User Options |
| If you select “Send Welcome Email”, an email will be sent to the new user inviting them to the new platform. If you select “Set Password”, you may set a password for this account immediately. This is ideal if you will be the new user. Both of these options may be selected. |
Password | Choose a secure password with at least one number and one uppercase |
Fill in their information and set a new username to use. Username and email are case-insensitive.
Under “New User Options”, you may choose to send a welcome email and/or set the password. The welcome email sent to the new user will contain a link to set up a password. The image below shows the “Set Password” checkbox checked which will allow you to set a password immediately that can be changed later if desired.
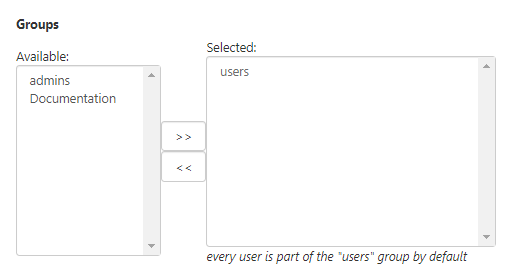
Group membership is managed on the right side of the page. If you need to make this new user an administrator you select the ‘admins’ group and then click the “>>” button to add this group to the selected groups list.
Set the new user to active by choosing “Yes” and finally click “Save”.
Remember to set Active to ‘Yes’ and set a password or they will not be able to login.
The user you just added will now be able to login with their username and password at your account URL and if you put them in the “admins” group - the Portal Administration.
Removing a User from Financial Institution
Removing a user is a misnomer, we will actually deactivate their account instead as we need the account to remain on the platform for audit purposes.
To deactivate the account:
Click the “Access Control” tab in the side navigation, and then “Users”. A table of users will appear.
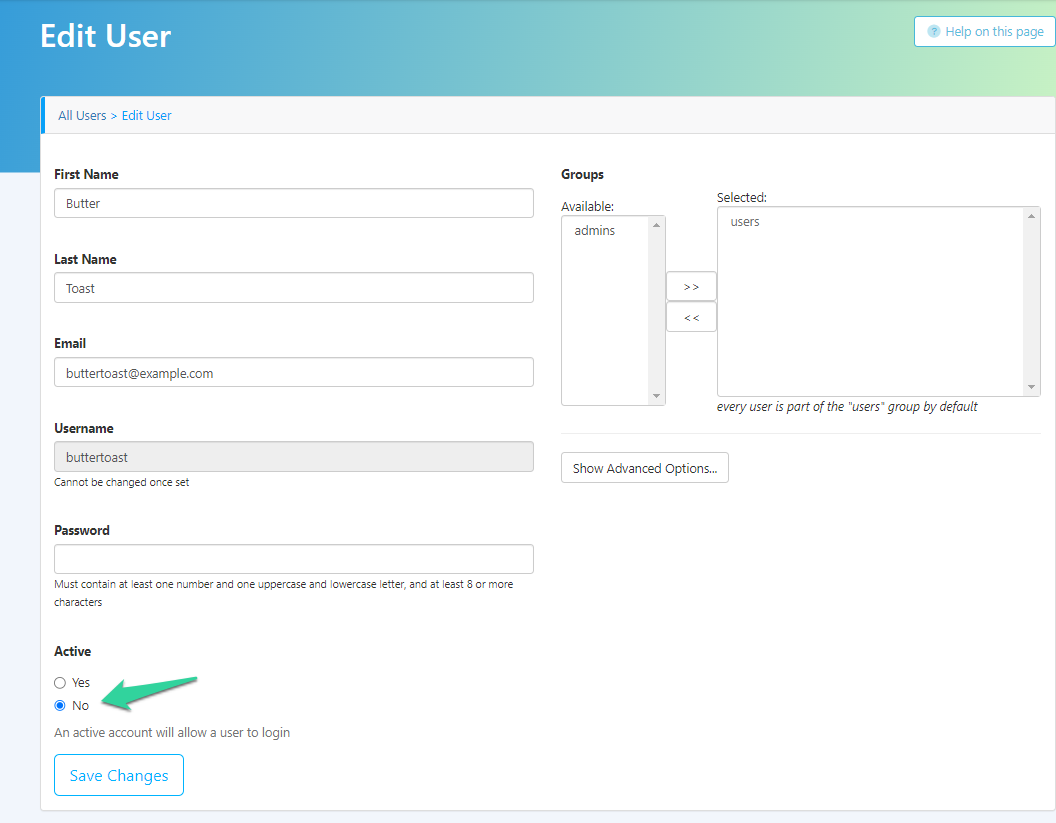
Click the username of the user you need to edit, the edit user page will appear.
Look for the “Active” setting and change it from “Yes” to “No”, click “Save”.
The user will no longer be able to login to the platform.
If the inactive user was signed in to the platform when made inactive they will still have access until their current session ends.
Adding a User to Business
Adding a user to a business account is done by the financial institution. This can be done to add a second (or multiple) user(s) to a business account.
Step 1: Find your accounts list
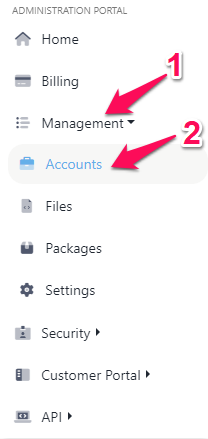
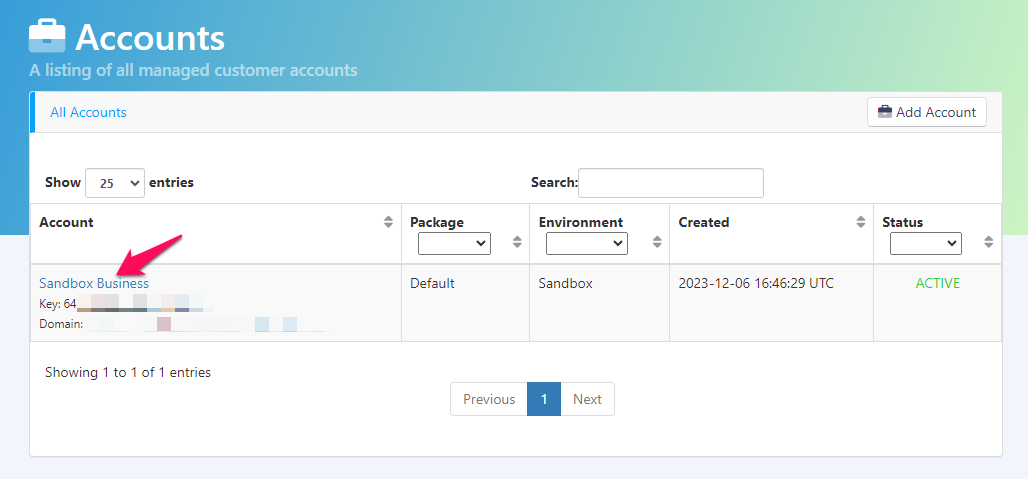
As the Financial Institution, start with logging in to your administration portal. Once you have logged in, please select Management > Accounts from the left navigation menu.
Step 2: Impersonate the business account
Next, please click the name of the business account you will be impersonating. This will lead to a configuration page. If you forgot your business account’s domain, you will see it listed here.
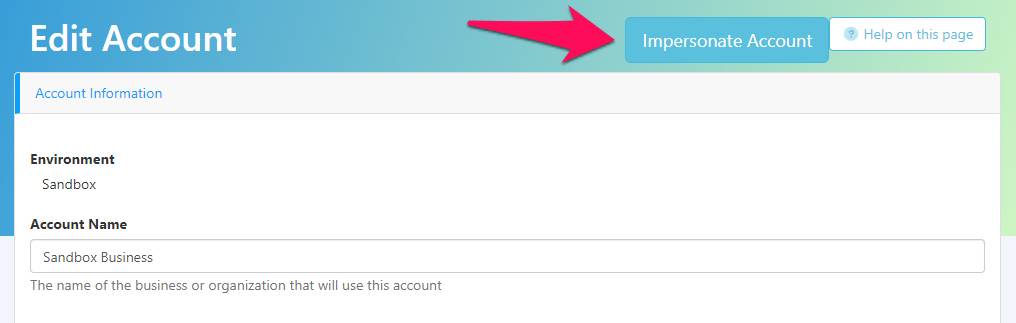
From this configuration page, please select the blue “Impersonate Account” button found in the top right. This will allow you to be a temporary admin user on the business account.
Step 3: Continue with Step 1 from Removing a User from Financial Institution
Adding a user will follow the same steps.
Step 4: End Impersonation
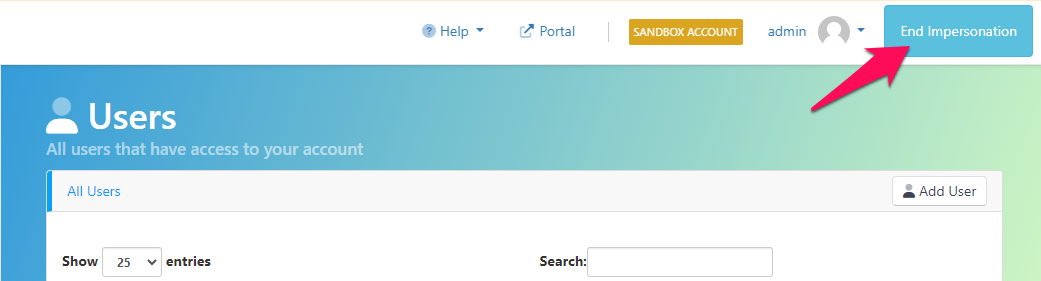
Once you have created the account, please select the “End Impersonation” button in the top right to return back to your accounts list on the financial institution’s administration portal.
Removing a User from Business
Step 1: Find your accounts list
As the Financial Institution, start with logging in to your administration portal. Once you have logged in, please select Management > Accounts from the left navigation menu.
Step 2: Impersonate the business account
Next, please click the name of the business account you will be impersonating. This will lead to a configuration page. If you forgot your business account’s domain, you will see it listed here.
From this configuration page, please select the blue “Impersonate Account” button found in the top right. This will allow you to be a temporary user on the business account.
Step 3: Continue with Step 1 from Adding a User to Financial Institution
Adding a user will follow the same steps.
Step 4: End Impersonation
Once you have created the account, please select the “End Impersonation” button in the top right to return back to your accounts list on the financial institution’s administration portal.
Group Management
This section covers how to add and remove groups from the platform. Groups are used to define a set of users that should be treated in some similar way. They may have roles or specific permissions attached that grant or deny access to parts of the platform e.g. “Borrowers”, “Underwriters”, “Loan Officers”, “Admins”.
Two groups “admins” and “users” are built-in to the platform and cannot be changed or removed. All users are part of the “users” group, while only designated portal administrators should be added to the “admins” group.
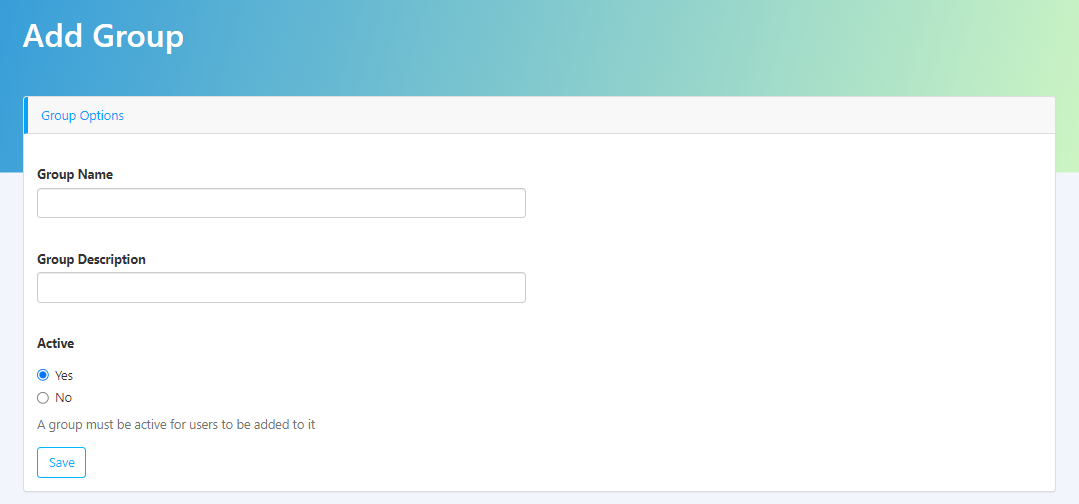
Adding a Group
To add a new group:
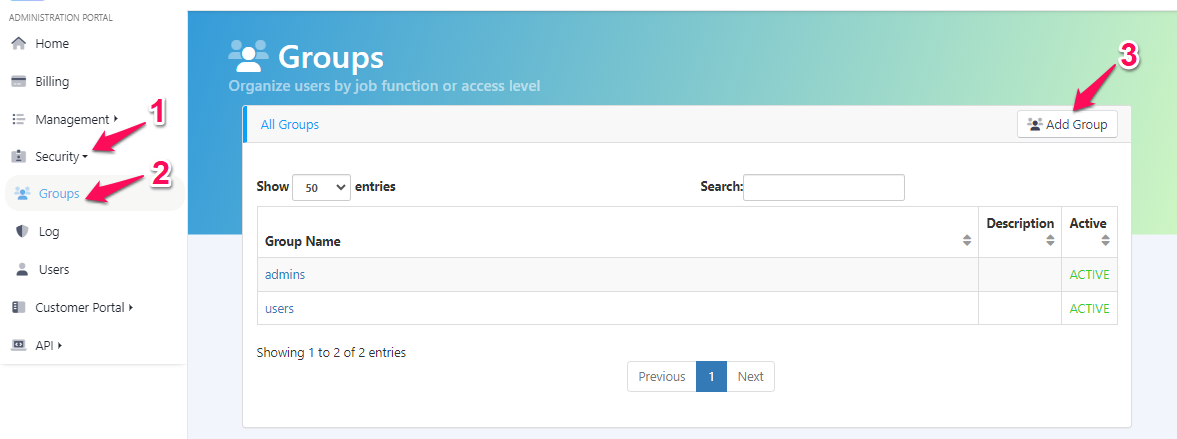
From the left navigation, select Security > Groups.
Select the “Add Group” button that appears near the top right corner of the page.
Provide a name for the group and choose the active option of “Yes” to make the group usable. The group name cannot be changed after it has been saved.
Click “Save”.
The newly added group will be displayed in the table of groups.
A group name cannot be changed once saved, If you make a mistake in naming the group simply remove the incorrect group and add a new one
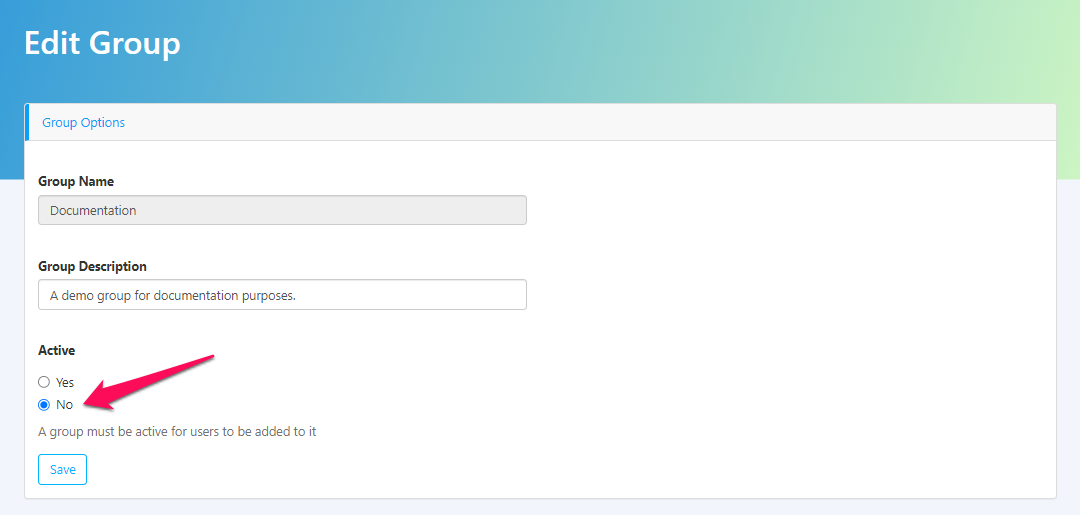
Removing a Group
Groups cannot be removed but may be deactivated so that users are no longer added to them. To disable an existing group:
Click the “Access Control” tab in the left navigation and then “Groups” from the drop down menu. A table of groups will appear.
Click on the group name.
Choose “No” for the “Active” option.
Click “Save”.
The group will still be shown in the table of groups but will now be listed as “INACTIVE” and users will no longer be able to be added to this group.
Groups may be reactivated later if needed by following the same procedure but choosing “Yes” for the active option.
When a group is deactivated any existing users who are members of the group remain members, they are not automatically removed.
Modifying Group Membership for A User
You can edit the group membership of a user after they have been added to the platform by:
Clicking on “Access Control” from the side navigation and then “Users”. You may then click the username of the user you wish to modify the membership of.
You will be presented with the “Edit User” page and from here you can add (or remove) groups from the “selected” set of groups by clicking the group name you want to change and using the “<<“ or “>>” buttons depending on whether you are adding to the selected groups or returning a group to the list available.
After modifying groups you will need to click “Save”
You may notice the Password field for the user is blank when you modify them, this is normal and should only be filled if you are changing their password.
Modifying Visibility and Editability of Forms and Fields
Once you have created a new group, you can edit the data.json5 file to alter the visibility and editability of forms and fields. This means that you can configure it so only certain groups can view or edit forms and fields. For more details on configuring the data.json5 file, please visit our documentation.