Link Connection Widget
Introduction
The Link Connection Widget is used if you want to present your end users with an easy way to connect applications and sync data including Accounting, Payroll and Commerce. Whether you need to connect once to pre-fill your application forms with client financial data or continuously sync to monitor, the link connection widget will make it simple for your business clients to connect and share data.
This page describes the process end-to-end and provides links to additional pages of details to get you started.
We assume that you have an existing web application that you want to extend with the Boss Insights API to gather data, and that you are familiar with frontend Javascript as well as a backend language (e.g. NodeJS / PHP / Python / Ruby / Java and so on)
Pre-requisites
Before development you’ll want to ensure the following items have been setup and configured
Have a sandbox or production Boss Insights account
Log in to your administration portal and create a Boss Insights API key
Setup 3rd party OAuth apps (this step is initially optional, as we provide a default Boss Insights app to use, but when you launch in production you will need to secure your own OAuth app credentials)
Configure which URLs are allowed to embed the link connection widget
Design & Development
Within your application you will be embedding the link connection widget which provides your business clients with an app selection list.
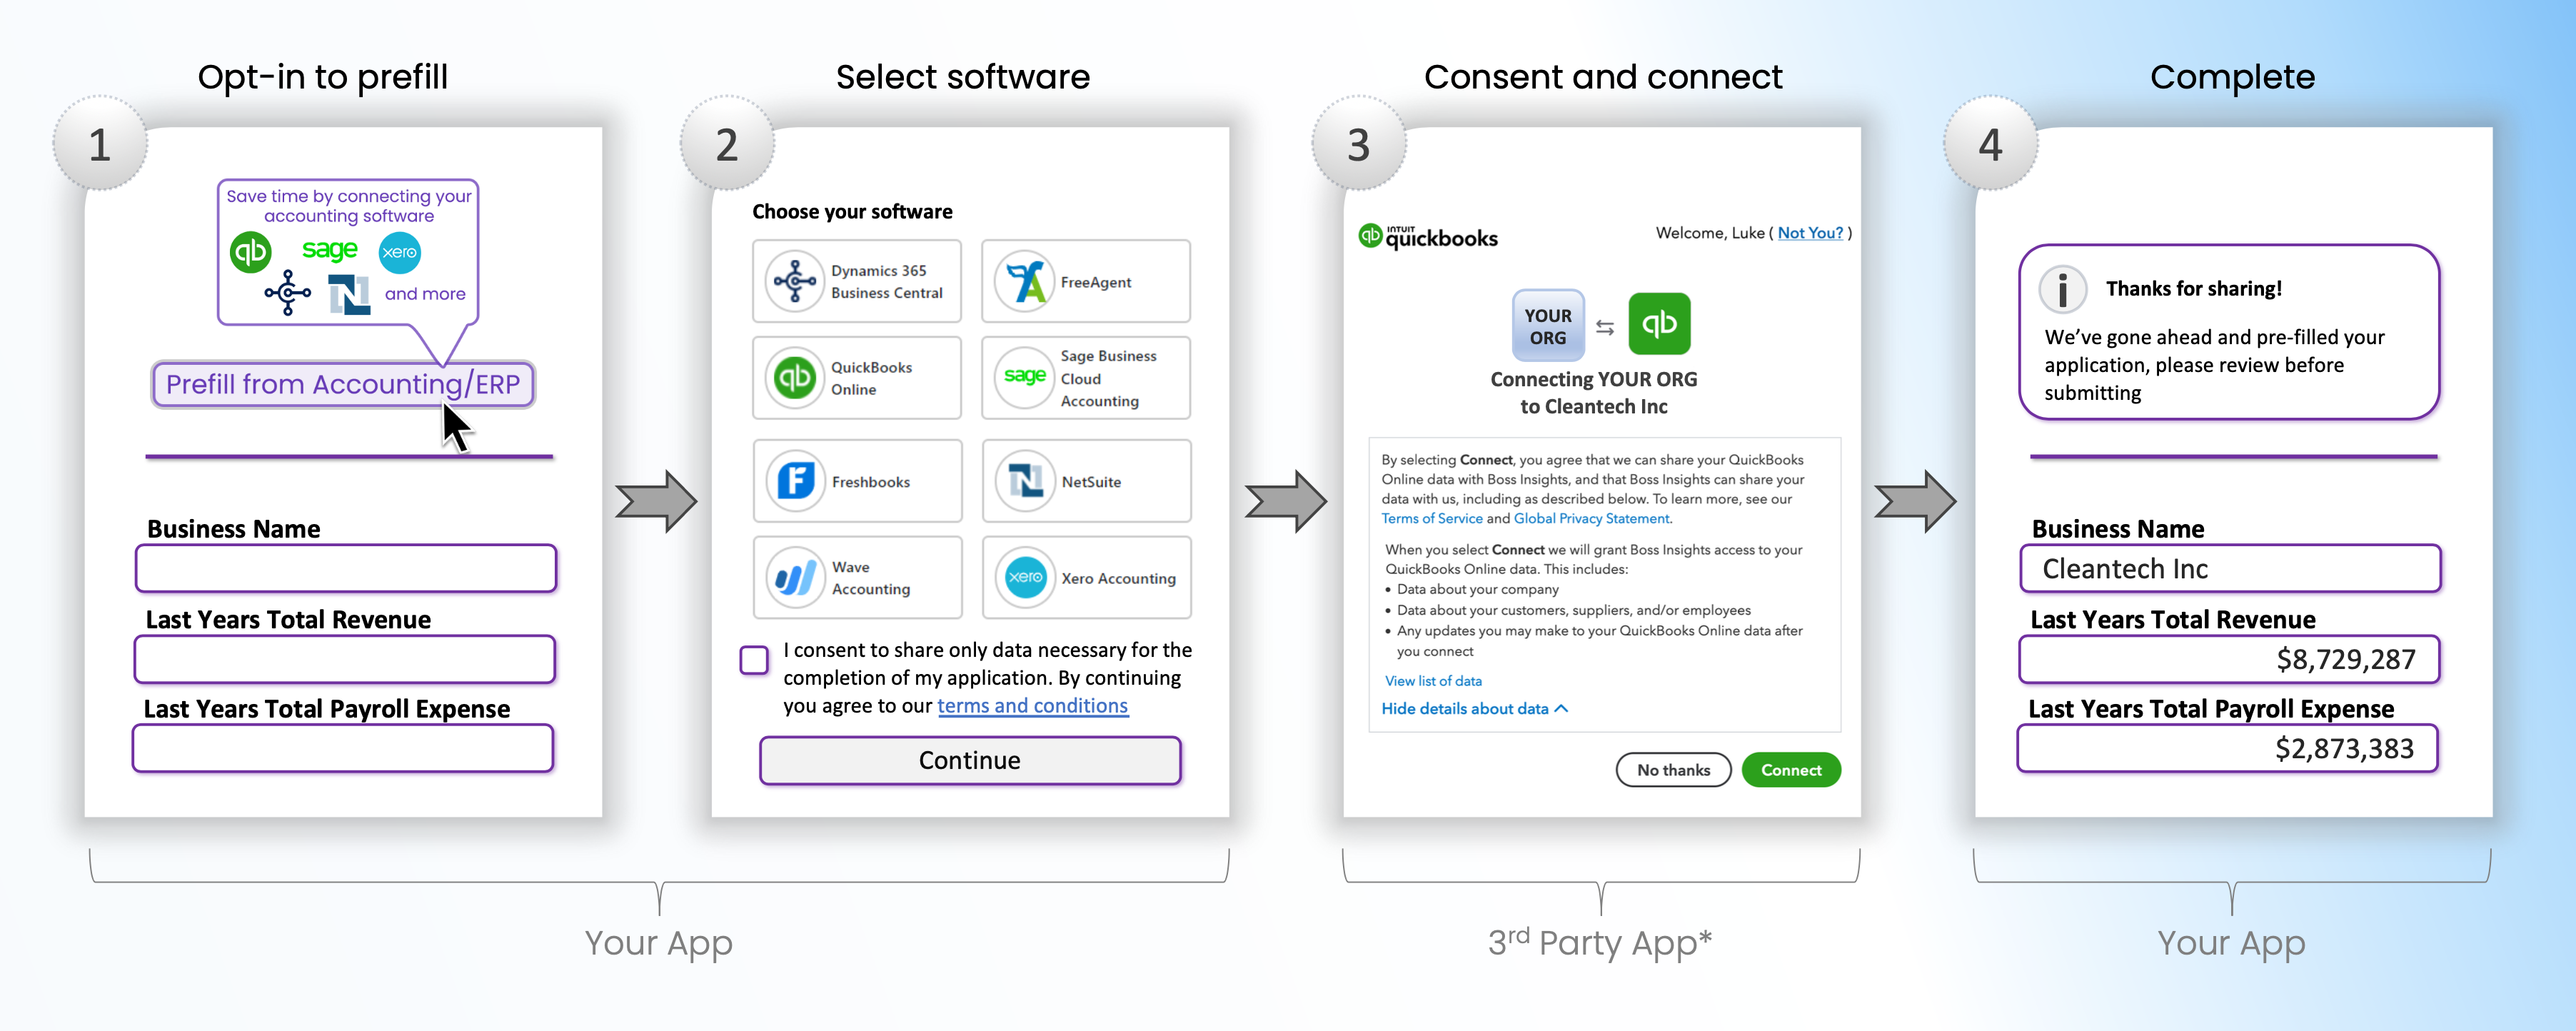
An example of pre-filling a form with data gathered from business client accounting software
Before you present each new business client with an option to connect you should assign your own internal identifier to the client in order to be able to later match this client with the data set accessed via Boss Insights, this ID would typically be stored in a database or other persistent storage.
For example your Clients table in your database might look like:
Client_ID | Client_Name | BI_Account_Key |
|---|---|---|
1 | Bob’s Motor Parts | 5ac2e93c0ea374.8274e293 |
2 | 5e393fb610d516.3006f221 |
Each time you need to sync a new business clients information from their apps (e.g. Quickbooks, Salesforce, Stripe) you need to:
Send a backend API request to provision an account on Boss Insights to process the data your customer is about to share. This API call will return information you should persist that you will need on subsequent API calls such as a unique “Account Key” and “Account Domain” which is used to refer to one clients set of data.
Send a backend API request to get an embed token , with this token you will be able to authorize the link connection widget
Display a menu of applications or data types to connect to and then get your customers' permission to access data via the Link Connection Widget. You will need to supply the Account Domain and the Embed Token from the prior steps when displaying this widget as well as the URL of a page you would like to redirect the user to post connection completion. If you get CORS security issues in your browser when testing this step see our section on browser security.
Use the Financial Data API to pull the business information you need. To access this you will need your API key as well as the Account Key of the business client you need to access.
Once your business client has connected an app you can continue to use the Financial Data API to pull their data until they explicitly disconnect or you force a disconnection.
Testing
After you provision an account for a new business client it will initially have no data in it. API calls to the Financial Data API will return empty responses. In order to test you will need access to either real client data or simulated data, we have two approaches to this:
Sandbox Accounting
This predefined static set of sample data can be accessed within Boss Insights sandbox accounts from the app selection screen, it requires no setup so its quick to try but has a limited set of accounting data to test with making it only suitable to use for trivial testing. Read more about the sandbox accounting application.

sandbox accounting provides a simulated app connection with sample data
Use 3rd party sandbox & demo accounts
Some third party application providers will give access to accounts specifically for development testing, they come under the titles of “Demo” , “Sandbox” and “Development” accounts and the process to get one is different for each application provider, for an example of this see our QuickBooks Sandbox Connection Guide.
At this point you should be able to have business clients connect and share data with you successfully. If you need additional support please reach out via our help desk.
If you don’t want to use the Link Connection Widget and would prefer to build your own connection UI see Connector API below.
Provision an Account
Before a customer can begin to share information a customer account needs to be provisioned to hold data synchronized for that specific business customer. To create a new account you need to make a POST request to the account administration API.
As part of the account creation, you will specify a secret password/key which you will need to store and reference in subsequent steps. You will also need to specify a subdomain, which should be generated with a reasonable degree of uniqueness because the account creation request will fail if the provided subdomain is already in use. The response from successfully creating an account will contain account_domain, subdomain and account_key fields that you should store for subsequent reference.
Link Connection Widget

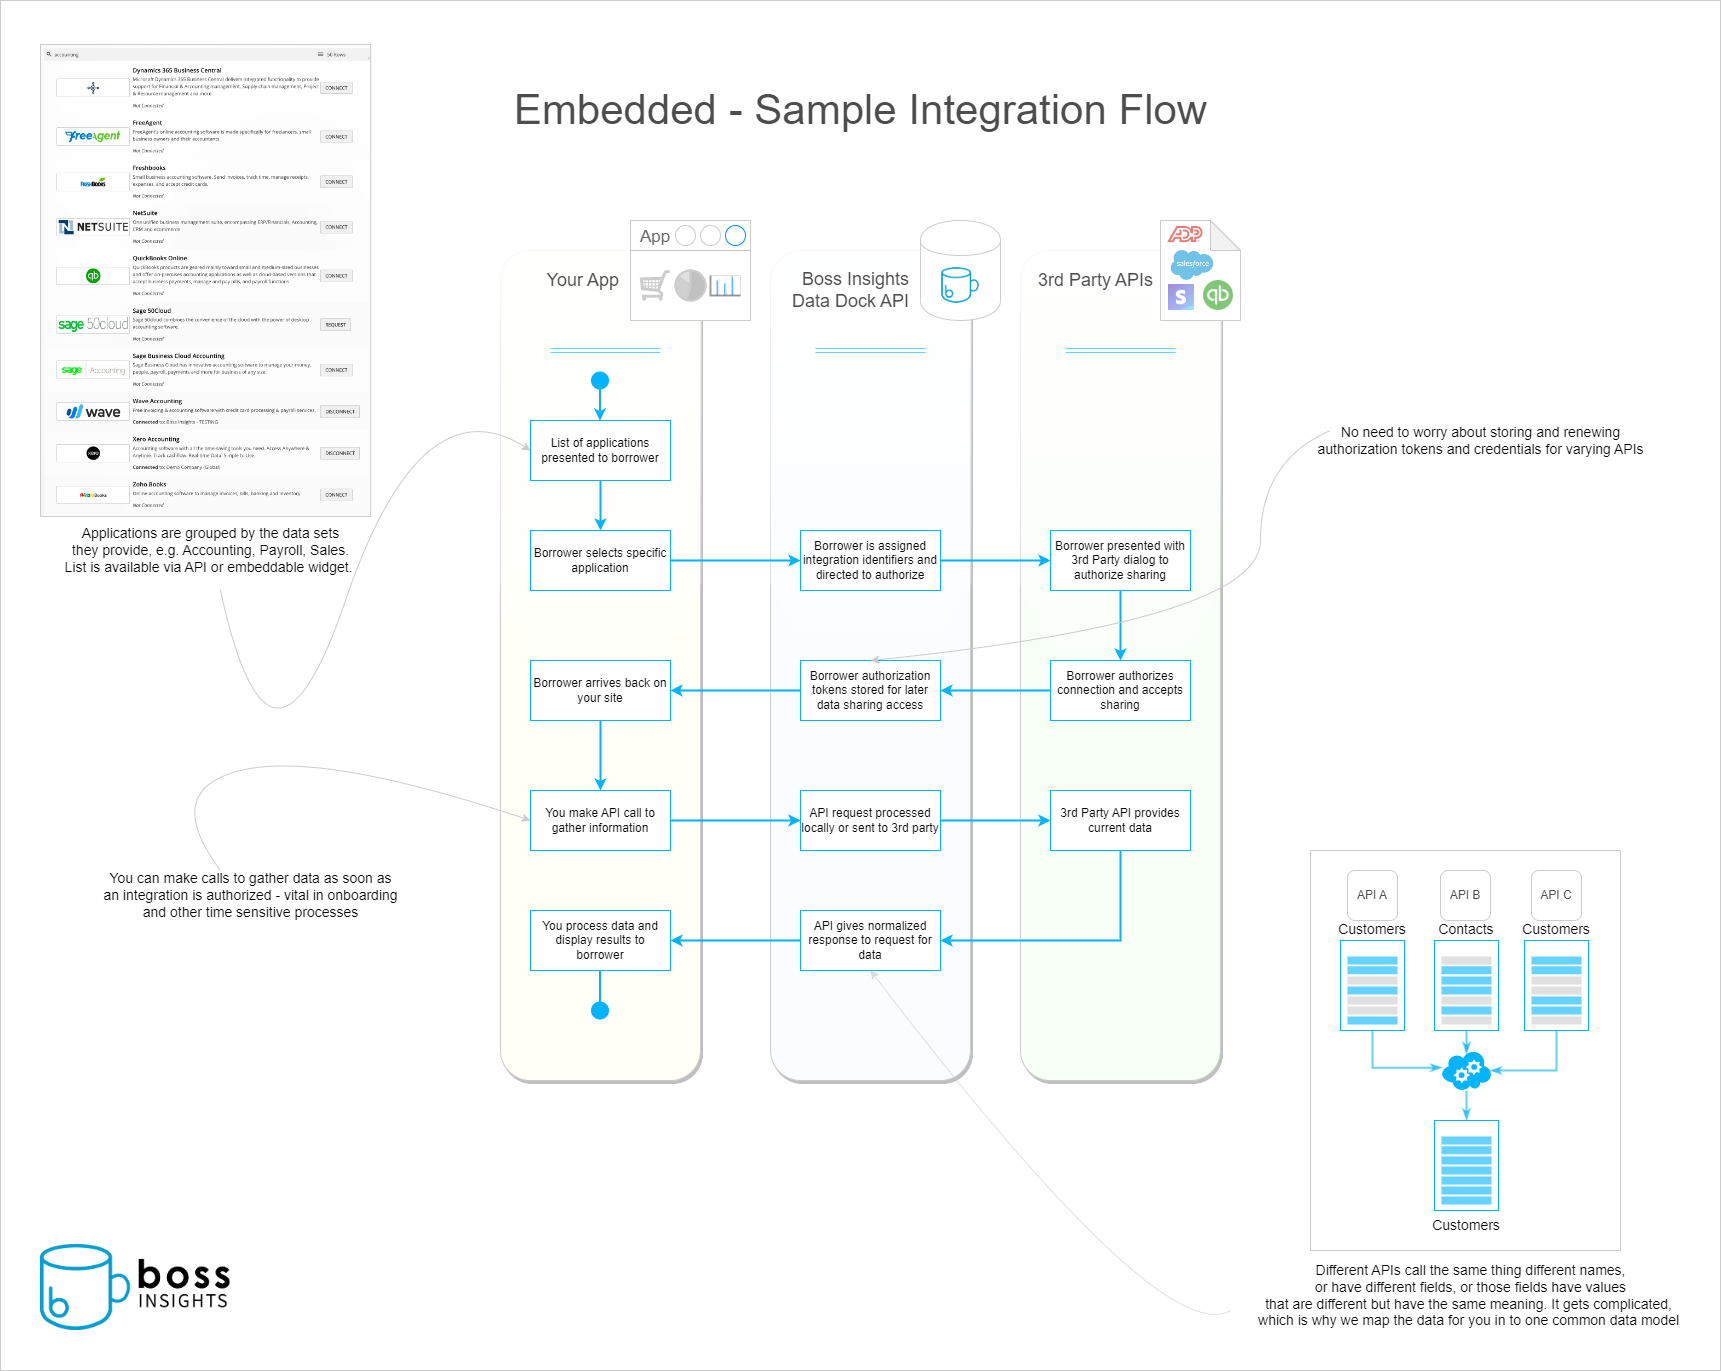
App selection provided by the link connection widget
The Link Connection widget will list all supported Apps (by name or data type) and handle credential validation, multi-factor authentication, and error handling for each app that we support. The Link connection widget works across all modern browsers and platforms including mobile (iOS, Android) and web) and automatically handles many implementation details.
Example integration flow for connecting to a end-user applications to access business data:
Consent and Connect
To connect a customer's business application software you first need to get their permission to access their account by connecting the App. Once the App is connected you can make subsequent API calls to gather data.
Embedding
To embed the Link widget into your web application you need to include a reference to a JavaScript file and create an HTML DIV tag within your page to render the widget within. This DIV tag will contain the application listing.
The container DIV tag:
<div class="DockLink_AppList"></div>The link widget does not use HTML iframes as many of the APIs we connect to use OAuth to authenticate the end user which is not compatible with frames
In order to access data you need to decide what type of data you want your user to provide and then display to them a list of app connection options that deliver the data. Platform types and example data sets include:
Accounting (tag:
accounting)Financial ratios and probabilities
Financial statements
AR/AP
Commerce (tag:
commerce)Subscriptions (inc recurring payments)
Purchases
Payment methods
Customers
Shipments
Sales
When embedding the link connection widget a set of platforms can be provided to limit the list to the types of information required.
The widget embed script:
<script type="text/javascript" src="https://example.myintranetapps.com/dock/link/2022-09-08/link.js"></script>
<script>
  var widget = new DockLink({
    container: document.getElementsByClassName('DockLink_AppList')[0],
    name: "Example Financial Institution",
    brand: {accent:'#FF0000'},
    domain: "{{ ACCOUNT_DOMAIN }}",
    cancel: "https://example.com/user-cancelled.html",
    redirect: "https://example.com/connection-complete.html",
    platforms: ['accounting','commerce'],
    filteredIntegrationsList: ['accounting_app1', 'accounting_app2', 'commerce_app2'],
    token: "{{ EMBED_TOKEN }}"
  });

  widget.render();
</script>
Content Security Policy (CSP) issues? JS/CSS not loading? See Browser Security
The domain of the
src="https://example.myintranetapps.com/dock/link/2022-09-08/link.js"attribute should be changed to your domain. (Replaceexample.myintranetapps.comwith your domain).When you provision an account, the Administration API response contains an
account_domainvalue that should be used here for the domain parameter. (Replace{{ ACCOUNT_DOMAIN }}with the newly provisioned account’saccount_domainvalue.)You will need to generate an embed token.
The following configuration values can be set when initializing the widget:
parameter | required | type | definition |
|---|---|---|---|
container | yes | htmlElement | The HTMLElement that the widget should render within |
name | no | string | The name of your company that you want displayed within the widget |
brand | no | Object | An object containing accent color and logo |
domain | yes | string | The account domain of the business account to gather and share data with. |
cancel | no | string | The URL a user is redirected to if they cancel the connection process |
redirect | yes | string | The URL a user is redirected to once a connection is complete |
platforms | no | array | An array of platforms that will be displayed in the widget, accounting and commerce are supported |
filteredIntegrationsList | no | array | An array of the apps to filter which apps should be displayed in the widget. The widget will only display the apps listed in the array |
token | yes | string | An embed token to allow an account connection to be made. |
search | no | bool | Whether to show an app search |
dataSecurity | no | string | URL to a security policy |
terms | no | string | URL to a terms and privacy policy |
Pull business information
After a connection has been established you can make API calls to the common data model and call upon different business data objects as shown in our examples.
Browser Security
Do not embed the widget within a html iframe, many integrations utilize OAuth and based on OAuth specs will block loading when requested from within a frame.
CORS Access
If you get errors in your browser about Access-Control-Allow-Origin you need to add the domain name you will be embedding the widget from to the allowed list of URLs. In the admin portal go to the “Embed” menu and then add the URL for your app and click save, the URL will then be added to a list that is allowed to embed the widget
Localhost problem: Many developers will encounter CORS issues when attempting to develop locally using localhost to access the link widget, we recommend creating a domain name which resolves to 127.0.0.1 instead to avoid this problem.
On Windows you can use Hostsman , on Mac you can use Gas Mask to accomplish this

Content Security Policy (CSP)
Embedding the link widget will result in external resources being loaded in to your page. These resources will come from your Boss Insights domain e.g. example.myintranet.apps , if you use a content security policy (CSP) header within your application you will want to add this domain to the list of allowed domains that can reference resources. Depending on widget configuration additional scripts, frames, images and stylesheets may be loaded.
Framing
The widget should not be embedded within a frame, many integrations utilize OAuth, the spec for which recommends blocking attempts to load inside of a frame.

If you see browser console errors related to framing ensure you are not loading the widget within a frameset.
Connector API
If you want to build your own user interface to present connection options to your customer without using our premade widget you can manage this process yourself. Please see our Creating Your Own Connection Interface page to get started.
You’ll need to redirect your users' browser to a specific URL to connect an application.
Please contact our support if you require additional assistance.